Joan of Arc – French Campaign
Mission 1: An Unlikely Messiah
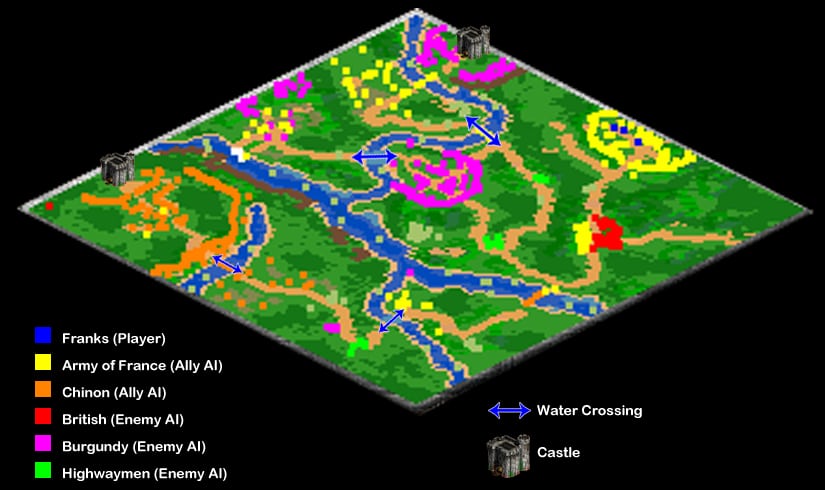
This walkthrough guide covers the mission “An Unlikely Messiah” which is the first out of six that make up the Joan of Arc campaign in the video game Age of Empires II: Age of Kings. This guide was created for the Hard difficulty, using the Age of Empires II: HD edition of the game.
An Unlikely Messiah starts the real core of the campaign of the game, being the first mission that allows different difficulty and speeds, while requiring you beat each mission in order, to progress. You start off with a small handful of units with which you’ll be expected to manage and keep alive, rather than any actual base building or economy. A few of these units will be Heroes, particularly Joan of Arc, who must survive the mission to win, her death resulting in a failure. Both her and the two hero knights you receive, are much stronger than your normal units and can regenerate their health over time, making them incredibly useful if cared for properly.
Objective: Escort Joan from the camp at Vaucoulers to the Chateau of Chinon. Joan must survive.
Meow Gallery: The layout none is not available in this version.
You’ll start out with just Joan and quickly receive the two hero Knights mentioned earlier. Start making your way out the camp towards the south and you’ll receive 4 Men-at-Arms and another 4 Crossbowmen to fill out your group for now. To help keep an eye on your heroes, and for purposes of control, it may be worth putting them on one control group with your basic military units on another, though for the most part they should still be moved together.
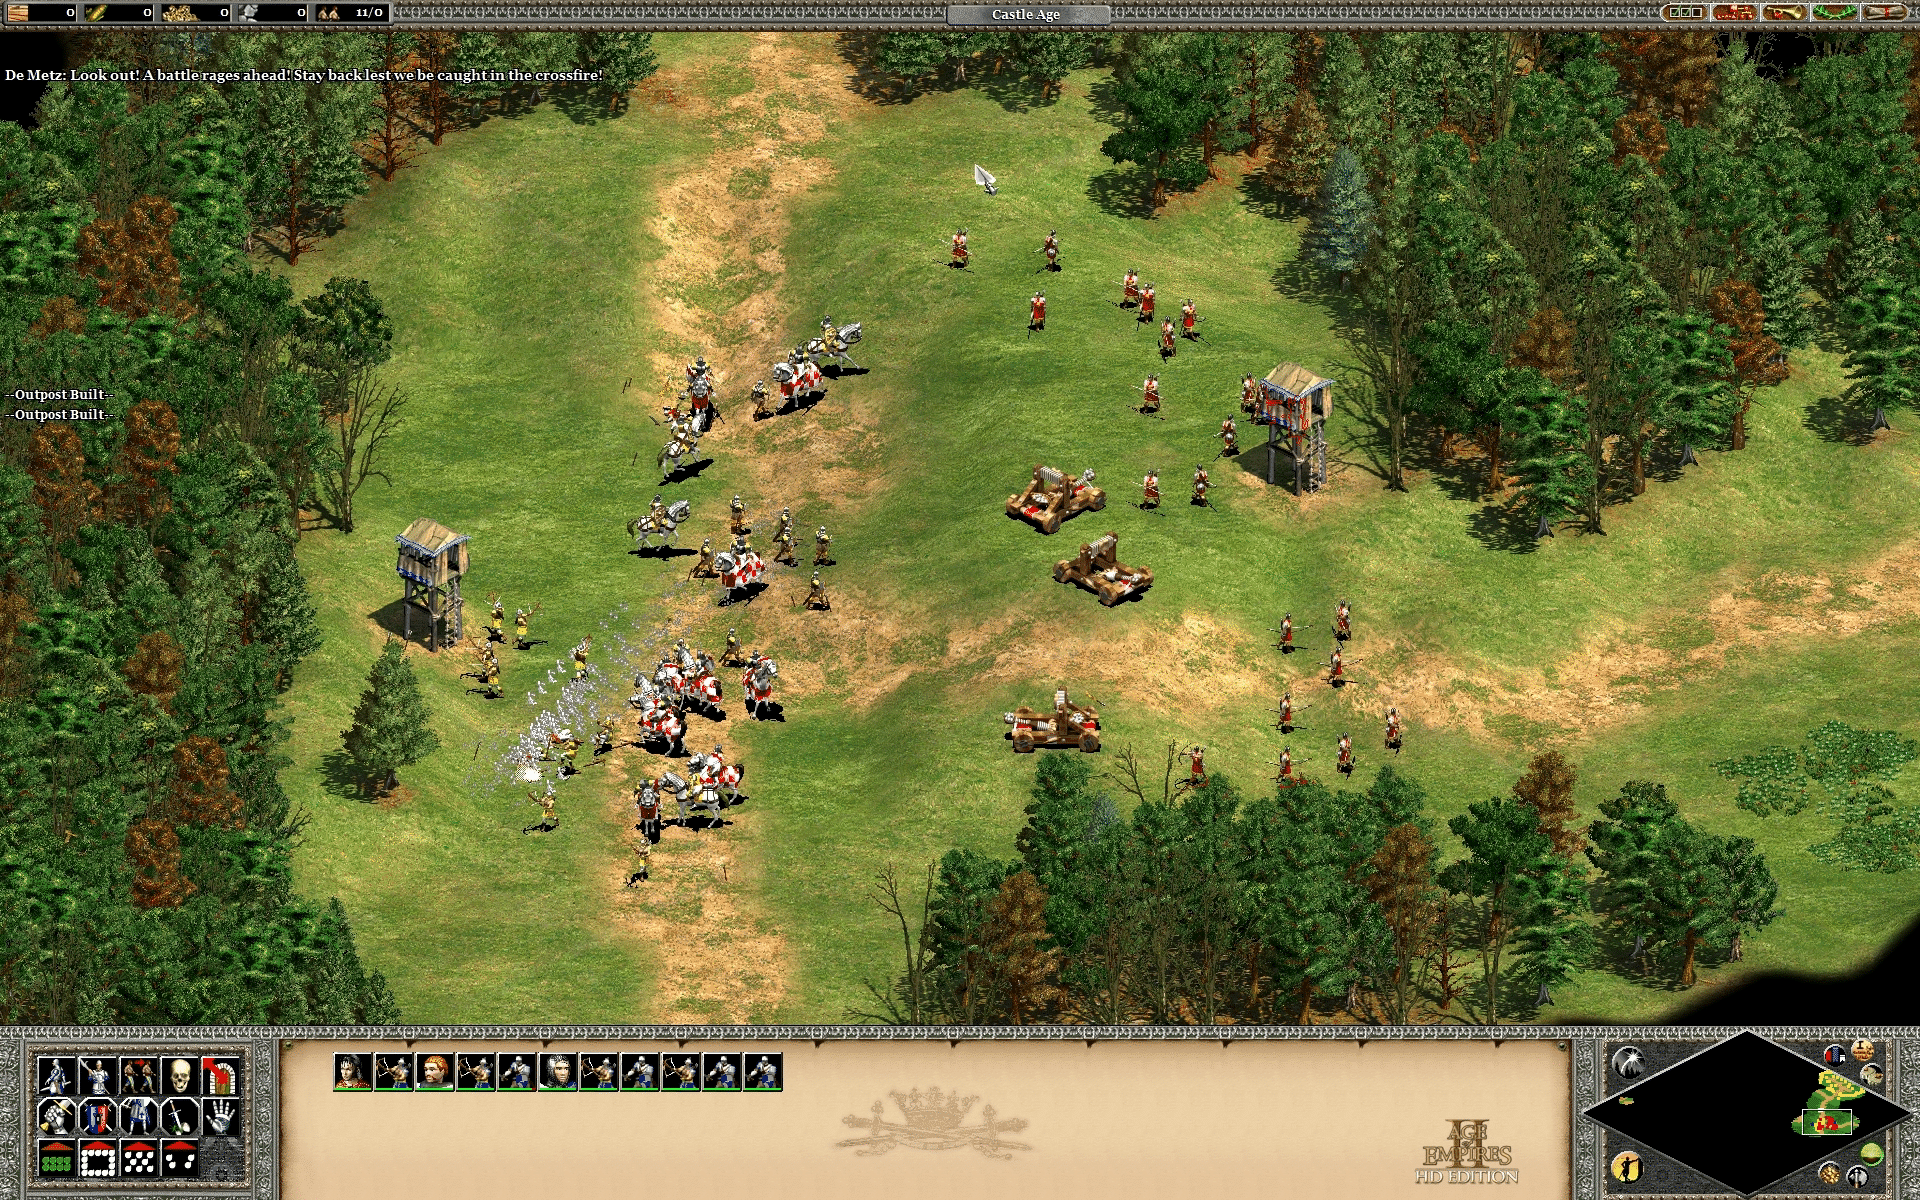
Avoid taking the path to the left, as it will lead to a death trap as seen in the pictures to the right. Instead keep going south, past a couple of wolves that may attack you but can be dealt with easily. You’ll eventually be warned to stay back, a warning you should heed, as you’re given visual of a large battle taking place just south of your small group. Avoid trying to help your allies, instead pulling back to avoid the enemy’s attention, as your allies are doomed to die, along with your forces if you try to help.
Meow Gallery: The layout none is not available in this version.
Further south you’ll come to a broken bridge which forces you to move east, then north a bit along the road, where you’ll encounter some enemy highwaymen. You’ll have to deal with these personally, which should be easy since it’s a small force. In small engagements like these, you can send you heroes up front, so they’re the ones to take damage, which they’ll heal later. This can be preferable to letting your normal units take damage which will eventually lead to their deaths since you have no means to heal them in this mission.
Here the path will split in two directions, the left path taking you towards a defended Burgundian town which you want to avoid for now. The right path, which you should take, leads you further around the outer edge of the town towards an allied encampment where you’ll receive additional forces. There are still some hazards on the way, namely a couple of packs of wolves and a smaller group of highwaymen, again best dealt with your heroes up front.
Taking on Burgundy’s Town
Meow Gallery: The layout none is not available in this version.
When you arrive at the allied town to the north of the Burgundian one you had to avoid for now, you’ll be welcomed with a substantial reinforcement of units that switch to your control. An additional 6 Pikemen, 4 Man-at-Arms and a Battering Ram are added to your forces. Avoid crossing the bridge that leads to the northeast from the town, as that takes you to a second base of Burgundy’s, heavily defended with soldiers and a Castle, which you stand no chance of defeating, not to mention have no need to do so.
Take your forces back across the bridge you crossed just prior to entering the yellow base and take them south to assault the walls of purple’s town. This is a good time to leave Joan of Arc behind to make sure she doesn’t perish in the assault. Send the Battering Ram against the gate with your forces in tow, making sure to be ready for when the enemy light cavalry come to the gate, opening it for you to swarm your units in and take out both the Archers that harass you and the closest Watch Tower. Avoid going to far south into the base to avoid the tower that guards the lower entrance.
Getting on the Boats
Meow Gallery: The layout none is not available in this version.
Before continuing too far west from the water crossing purple was defending with their base, count out how many units you still have (leave the Battering Ram behind). If you have more than 15, you will want to leave a few of your basic military units behind for the time being. Now is also going to be a good time to save the game if you haven’t already.
When you reach the next allied base to the west, you’ll almost immediately be alerted to the fact it is under attack by Burgundy. Purple’s units swarm over the allied base while you are forced to run to 3 transport ships that are gifted to you and load up into them, before their forces can surround and kill your units. There is no way to fight them off.
Making Your Way to Chinon
Meow Gallery: The layout none is not available in this version.
Take your transport ships southeast along the main river, where you now have two choices. You can end the mission now, dropping your units off at a secret landing spot seen in the first picture to the right. Here a clearing in both the trees and cliff line that run along the north of Chinon allows you to move your forces south to arrive right in friendly territory, meeting up with the road that leads into the center of the city and your objective.
Your second option is to move your transport ships past an enemy Galleon and drop them off in the larger clearing by some friendly Crossbowmen and a Scorpion that switches over to your control with Joan’s presence. Use your ships to keep the enemy War Galley busy while you take your forces, combined with the reinforcements and move them south to encounter a couple of final groups of enemies.
Use your two hero Knights as bait to pull the next enemy group to your main force, first the Highwaymen and their small group of soldiers (green) which are right on the south side of the river crossing, south of where you landed. Once those are dealt with, run up the corner until you encounter purple’s group, which consists of 4 Man-at-Arms and a Mangonel. You’ll need to rush the siege weapon with your Knights, which is the main reason for using them this way, as just a shot or two can devastate your small army. Once that is down, which shouldn’t take long, the rest of your forces can wipe up the soldiers and make their way into Chinon to the northwest, unhindered.
Mission 1: An Unlikely Messiah
Video Walkthrough
Last Updated on October 7, 2020 by Standard of Entertainment