![Chapter 2: Against all Odds - Servo Skull Journal: Guardsman Alexander [2-5]](https://standardof.net/wp-content/uploads/2020/09/Space-Marine-Servo-Skulls-Guide-Journal-Guardsman-Alexander-2-5-3.png)
This guide covers the locations of all of the collectible Servo Skulls which are located in chapter 2, Against All Odds, of the video game Warhammer 40,000: Space Marine. All of the 48 servo skulls in the game are located throughout the various levels, typically in out of the way locations, with each providing some form of backstory and lore to the events taking place through the form of short recordings left by other people on the forge world. Collecting all of these, besides providing interesting information, contributes towards unlocking special achievements.
Servo Skulls in Chapter 2 “Against All Odds”
- Audio Log: Workshift 465 [1/5]
- Journal: Guardsman Alexander [1/5]
- Audio Log: Medicae Station Ventris [1/5]
- Battlefield Log: 2nd Lt. Mira [1/5]
- Journal: Guardsman Alexander [2/5]
*Presented in order found during a normal playthrough.
1. Audio Log: Workshift 465 [1/5]

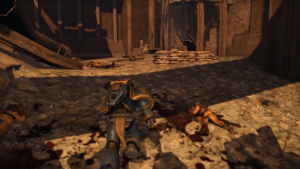
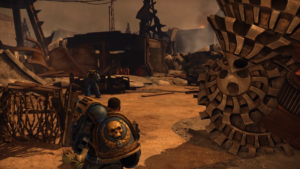
The first servo skull is found at the very beginning of the level. After making your way from the wreckage of the ork ship, you’ll come towards the entrance to a building as seen in the first picture to the right. You will fight some gretchin (the tiny orks you can stomp out) who will run away from you and into this building. Before actually entering the building, turn to your right and follow the path that leads to some high ground, strewn with corpses of imperial guard. At the top of this path you will find the servo skull amongst some other debris and more bodies.
Graia: “Workers Assemble”
Lilith: “Caleb, there you are. The Shiring brothers are saying we’re under attack!”
Caleb: “The brothers are idiots, Lilith.”
Lilith: “They saw Roks in the sky.”
Caleb: “Xenos, here? Damned Unlikely”
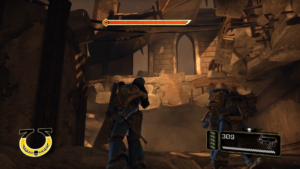
2. Journal: Guardsman Alexander [1/5]
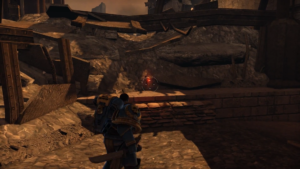
This next skull is near impossible to miss. As you are about to enter the trenches area, just after meeting up with Leandros, Titus will start a conversation that begins with “Sidonus picked up the local Imperial Guard communications.” You should see the glowing red eyes of the servo skull directly in front of you by some sandbags and destroyed walls.
“Personal message cache; Guardsman Thomas Alexander. Must be winter back home. No snow here, that’s for certain. We’ve been diverted to a Forge World under Ork attack. The defenders are all dead, the Orks are killing everyone on the planet, and we’re the only Imperial Guard in the sector. The fleet’s on the way — but they’re a couple of weeks out. We’re in for a hard fight.”
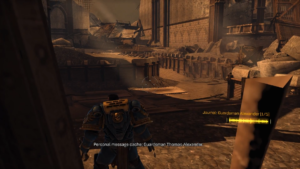
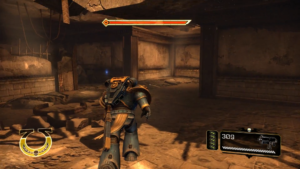
3. Audio Log: Medicae Station Ventris [1/5]

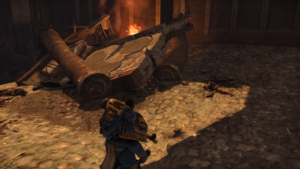
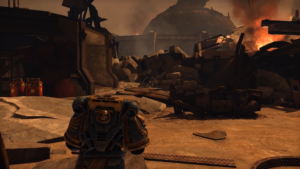
The third servo skull in chapter 2, Against All Odds is found after locating Mira, still in the Trenches part of the level. Eventually you’ll be attacked by several ork transports that burrow up from underneath the ground, releasing large groups of Orks that will attack you. After fending them off, check the bunker seen in the picture to the right where you’ll find the servo skull inside, at the far end.
Magos Cassia: “– not in the disease ward, Dominus. What’s wrong with her?”
Dominus: “Ork projectile to the leg, Magos Cassia.”
Cassia: “Amputations are down the hall.”
Dominus: “Very well. I shall prepare for the implant grafting–“
Cassia: “No implants. Just get rid of her leg and stitch her up fast. We’re at war–“
4. Battlefield Log: 2nd Lt. Mira [1/5]
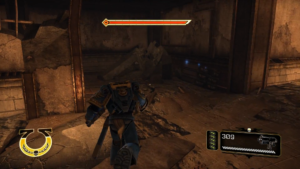

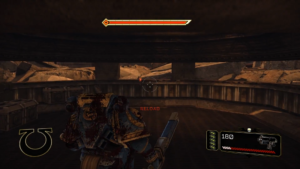
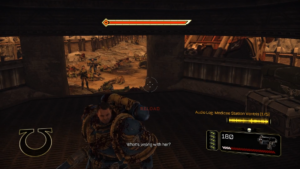
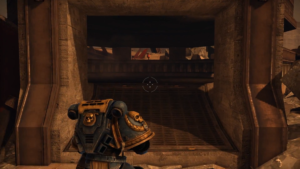
The fourth skull will be found once you’ve entered the latter part of the level, No-Man’s Land. You will be going through some ruined buildings when you approach the scene seen to the right, however with the (now) deceased ork in the picture, still alive and sniping at you from the level above. This will be your reference point to let you know when to start looking.
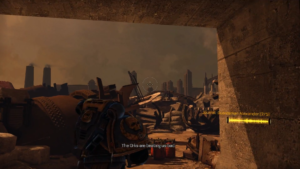
Keep moving forward, but as opposed to taking the hallway which leads further through the level and out into the open, seen on the right in the second picture, take a left instead to find a small alcove with some ammo boxes and around the corner, this next audio clip.
Captain: “–just get the ship out of orbit, pilot.”
Guardsman: “Lieutenant Mira! The Orks cut off our reinforcements.”
Lt. Mira “Damn it — I suggest we move the unit to a more defensible position, sir.”
Captain: “Do it. And make sure–“
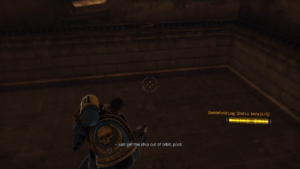
5. Journal: Guardsman Alexander [2/5]

Towards the end of this level during the objective Enter the Gun Fortress, actually not too far from the fourth skull, you’ll be back outside fighting Orks all over the place, with more of the transport vehicles the burrow up from under the ground. You’ll also see several of the large Ork defense towers in the distance and the main objective, the orbital gun fort which has been captured by the Orks, in the distance.
Past one of these vehicles on the right and some barbed wire on the left, you’ll find a bunker with some red explosive barrels against the side of the building, which should also be the first bunker you find in this area. Look inside this bunker and you should find the final servo skull of Chapter 2 floating in the center, waiting for you to collect it.
“Personal message, Guardsman Alexander. I’ll be quick. The Orks are beating us bad. We’re completely outnumbered — every time you kill one of the bastards, feels like a dozen take their place. And my mate Gareth. An Ork chopped his leg off and he bled out — nothing I could do. The officers are all dead. A second lieutenant’s taken over. She’s keeping us focused — Wait — we’re moving out. More soon.
“Against All Odds” Servo Skull Video Guide
Last Updated on October 4, 2020 by Standard of Entertainment